Sunday, 16th June 2024
Father's Day Crafts
Fathers Day is a perfect occasion to show your love and gratitude for your daddy. So kids, make the best use of the opportunity and show your talent by making some innovative Fathers Day Crafts.
Here are some simple and easy ideas on Fathers Day Craft Projects for Kids and Teens. We encourage children to get inspired by these ideas but they must strive to add a dash of their own creativity while making the most special personalised handmade gifts for fathers. Your father will surely feel on top of the world when he receives a precious Father's Day Craft from his loving child.
»
Twig Frame
» Father's Day Collage
» DAD Picture Frame Craft
» Pen Holder Collage
» Business Card Holder
Fathers Day Crafts ideas for Teens» Father's Day Collage
» DAD Picture Frame Craft
» Pen Holder Collage
» Business Card Holder
Fathers Day Crafts Ideas for Kids: Twig Frame
A simple-to-make rustic picture frame made from twigs.
Things Needed
Twigs
Twine or string
Glue (hot glue works well)
A photo for framing
Method
- Collect 2 bunches of twigs. One bunch (about 6 to 8) should be about 2 inches longer than your photo. The other bunch of twigs should be about 2 inches wider than your photo.
- Arrange the twigs so that they surround the photo and extend outward about an inch in each direction. Tie the twigs at each corner using twine or string, making an "X" pattern.
- Glue the photo onto the back of your twig frame. Hot glue works the best.
- Glue a small loop of string to the top batch of twigs for hanging the photo.
Things Needed
1 piece of construction paper
Old magazines
Scissors
Glue or glue stick
Method
- Let your child leaf through old magazines to find pictures, images and, if he's old enough, words that remind him of Dad. They can be pictures of things that Dad enjoys doing (jogging, skiing, cooking), or things that remind your child of his father (trees, like the one they climb together, or a bus, like the one Daddy rides to work).
- Help your child cut out the pictures. Talk about why he's chosen his selections.
- When he's found as many as he wants, help him arrange them in a collage on the construction paper. Should certain items be put together? Why?
- Help your child glue his pictures on the paper. It doesn't matter what the finished product looks like. What's important is that you've created a special time for your child to think carefully and with appreciation about his father.
- Encourage your child to present the collage to Dad and explain the meaning of the images. Now that's a Father's Day present!
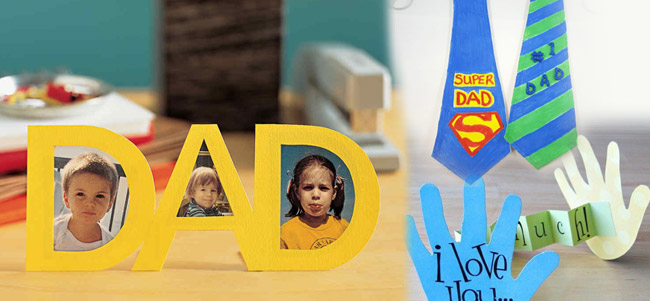
Fathers Day Crafts Ideas for Kids: DAD Picture Frame Craft
A simple-to-make picture frame for Dad - a great gift for Father's Day.
Things Needed
3 small photos
Glue
Scissors
Heavy paper (like oak tag)
Method
- Using large, bubbly letters, write "DAD" on a piece of heavy paper. Make sure the holes in the "D" and "A" are large enough to display your photos.
- Cut out the word "DAD."
- Glue the photos onto the back of your frame. Write the names of the people on the backs of the photos.
- Cut out two almost-triangular pieces of heavy paper - they should be about the same length as your letters are high. These flaps will be attached to the back of the frame to keep it standing.
- Fold over the top 1/2-inch of each flap.
- Glue the almost-triangular pieces of heavy paper to the back of the frame.
Make a pen holder featuring father's favorite things - any hobby or interest can be used, you just need pictures of the thing you want to put on it! This project is rated VERY EASY to do.
Things Needed
Empty soup can
Old magazines (that you can cut --- get permission first!)
White "school" glue
Scissors
Paint brush
Construction paper (background), optional
Color photocopies of the family, optional
Clear Con-Tact paper, optional
Method
- Make sure that the can is clean and dry.
- If you are going to use a construction paper base (then you don't have to cover the entire can with pictures) glue it to the can - making sure to glue down all the edges well, and overlapping the paper a bit where it meets.
- Go through the old magazines and find words and pictures that remind you of the person you're making the gift for. (It can be words like love, sports, tools, jogging, running, crafts, work, fun, games, or any other words that make you think of him or her. The pictures don't need to look like him/her or even be pictures of people. Do they love animals? Sports? Fishing? Cooking? Try to find small pictures of things.) Cut these out as carefully as you can, leaving a small border around the edges.
- This project usually works better if you glue the pictures on first and then use the words to fill in the empty spaces. This makes it easier to read the words as well. You can place the words horizontally (side-to-side like they are in books) or diagonally (on a slant). Cover as much of the can as you are able. Let the can completely dry before the next step!
- Check all edges to make sure the pieces are all smooth and repair any that are sticking up instead of laying flat against the can.
- Make a mixture of glue and water. Use the paintbrush to lightly
coat the can. This will "seal" your work and it should
keep the edges from curling up later.
OR - cut the Con-Tact paper to be a bit larger than the can. Carefully wrap it around the can. Trim off the excess.
- Wrap the can and give it to Father on his special day!
What a cute gift this can be for Dad. Decorate the Popsicle sticks with hearts, stars, or other designs made out of Woodsies, felt or construction paper. This project is rated EASY to do.
Things Needed
11 Popsicle sticks
Scissors
Green craft paint
School glue
Decorations (Woodsies, paint, pom-poms, etc.)
Wax paper or plastic bag (to protect work surface)
Method
- Lay out a piece of wax paper or recycle a plastic bag to protect your work surface. Note: Newspaper will stick to the project.
- Glue the three sticks together. This is the front side of the card holder.
- For the base of the business card holder, lay 2 Popsicle sticks flat next to each other and glue together in the same fashion as that of the front.
- For the back of the business card holder, lay 4 Popsicle sticks flat next to each other side to side, and also glue together.
- For the sides of the card holder, cut 1 and 1/4 inch off of the top and bottom of 2 Popsicle sticks.
- Lay 2 long edges together, side to side and glue together. (see photo)
- Repeat with other 2 ends for the other side of the card holder.
- Glue the front to the base at a right angle.
- Glue the back to the base also at a right angle. Now you should have a U-shaped figure.
- Glue the right and left sides to the base, front, and back of the card holder. Now you should have the actual card holder finished.
- Let dry.
- Add decorations such as painted Woodsies shapes, pom-poms, or anything you would like.
Fathers Day Crafts Ideas for Teens: Memory Album
Along with pages for photos, this album can hold an abundance of other mementos.
Things Needed
1 sheet of 20 x 30-inch handmade paper (available at crafts stores)
8 sheets of 20 x 26-inch heavy art paper
Spray adhesive
Scraps of black and gold art papers
Crafts knife and hole punch
2-3/4- x 9-inch scrap of soft leather or suede
White glue
7/8-inch diameter O-rings
16-inch length of brass rod or tubing, cut in half
2 envelopes, 9 x 12-inch
4 feet of 1/4-inch-wide grosgrain ribbon
1 old family photo
Crochet hook
Use any color of 9 x 12 envelope.
Method
1. Make Bound-In Envelopes
Use purchased 9 x 12-inch envelopes, or make your own from art paper. Open up a purchased envelope and use it as a pattern. Glue hook-and-loop fastening-tape dots to the flap and envelope.
2. Make Album Pages
Cut the heavy art paper into 12 sheets measuring 9 x 14 inches. On each page, score 1 inch in from one short edge. To score paper, draw the crafts knife lightly across the surface of the paper, using the ruler as a guide. Fold the paper to the front along the scored line. To deckle the opposite short edge, hold the ruler firmly on the paper about 2 inches from the edge and carefully tear the paper along the ruler.
3. Make Album Covers
Cut two 9 x 24-1/2-inch rectangles from the handmade paper. Fold each piece in half to make a doubled 9 x 12-1/4-inch rectangle. Score each cover 1 inch from the cut edge to make the spine.
4. Assemble the Front Cover
To make a window for the front-cover photo, open out one cover and draw a 2-3/4 x 3-1/2-inch rectangle centered on the right side. Cut out the window with a crafts knife. Make a 1/4-inch slit in the fold for the ribbon, centering the slit. Thread a 24-inch piece of ribbon through the slit. Glue one end of the ribbon at the back edge of the front cover and leave the remaining end free, beyond the fold.
5. Mount Photos
From the black and gold art papers, cut rectangles slightly larger than the family photo; the black rectangle should be larger than the window opening. Use spray adhesive to mount the photo on the gold paper and then attach the gold rectangle to the black one. Center the photo on the left half of the inside front cover over the ribbon, and secure it in the corners with small pieces of tape. Apply spray adhesive to the right inside front cover (the window side), then refold the cover along the fold line and press in place.
6. Assemble Back Cover
Open out the folded 9 x 12-1/4-inch rectangle and cut a slit in the fold at the center to match the slit on the front cover. Thread ribbon through, securing one end at the back edge with a dot of glue. Apply spray adhesive to one side of the inside back cover and press the two sides together.
7. Make Leather Spine Wrap
Make a template for punching the holes from a 1 x 9-inch piece of heavy paper. Use the hole punch to make holes 1-1/2 inches from the top and bottom edges and 1/2 inch in from one long edge of the template. Attach the template to one long edge of the leather spine wrap and punch two holes; repeat for the opposite edge.
8. Attach Template
Working with one page or envelope at a time, clip the template to the folded tab edge of each sheet of paper and the bottom of each envelope, and punch the holes.
9. Assemble Album
Stack the back cover, pages, envelopes, and front cover, lining up the holes. Wrap the spine with the leather strip, aligning the holes. Using a crochet hook, pull an O-ring through each hole, then push a rod through the O-rings on the front and back of the album. The rod and O-rings hold the book together and can be disassembled if you want to add more pages.
Fathers Day Crafts Ideas for Teens: All-Star Dad Box
Things Needed
Photo of Dad to bring back old memories.
Paintbrush; satin varnish
Black fine-tip permanent marking pen
Selected photograph
Mat board (optional)
Crafts glue
4-3/4 x 4-3/4-inch papier-mache box with photo insert opening
Five 1-5/8-inch-diameter wood stars
Nine 1-1/4-inch-diameter wood stars
Ten 7/8-inch-diameter wood stars
Acrylic paints: bright gold, black, gold, yellow, and light yellow
3 x 3-inch piece of white card stock
- If boxes with photo insert openings are not available, use a box with a plain lid; glue photo to top of lid and decorations around edges of photo.
- If your photo is smaller than the lid frame opening, cut a piece of mat board to fit inside lid frame. In the center of mat board, cut an opening to accommodate your photo.
- Remove lid inset; set aside. Paint all surface of lid frame black. Paint all surfaces of box base bright gold. Divide the stars into four groups of six assorted sizes each. Use black, gold, yellow, and light yellow to paint each group of stars a different color. Let dry.
- Arrange 20 stars on lid frame; glue in place and let dry. Apply a coat of varnish to all outside surfaces of the decorated lid and to the four remaining stars.
- Use fine-tip marking pen to letter All-Star Dad! on the card stock. Glue card stock to inside bottom of box; glue remaining stars on card. Insert photo in lid frame; replace backing.
Things Needed
Paintbrush; satin varnish
Black fine-tip permanent marking pen
Selected photograph
Mat board (optional)
Crafts glue
4-3/4 x 4-3/4-inch papier-mache box with photo insert opening
Six 3/4-inch-tall wood X letters
Six 3/4-inch-tall wood O letters
Two 1-1/2 x 2-1/2-inch wood hearts
Two 3/4 x 7/8-inch wood hearts
Acrylic paints: white, black, and red
4 x 4-inch piece of white card stock
Method
- If boxes with photo insert openings are not available, use a box with a plain lid; glue photo to top of lid and decorations around edges of photo.
- If your photo is smaller than the lid frame opening, cut a piece of mat board to fit inside lid frame. In the center of mat board, cut an opening to accommodate your photo.
- Remove lid inset; set aside. Paint all surfaces of lid frame white. Paint all surfaces of box base red. Paint the wood letters black and the hearts red; let dry.
- Arrange two large hearts, six Xs, and five Os on lid frame. Glue in place; let dry. Apply a coat of varnish to all outside surfaces of decorated lid and to remaining letters and hearts.
- Use fine-tip marking pen to letter "this dad deserves hugs & kisses!" on card stock. Glue card stock to inside bottom of box; glue remaining letters and hearts on card. Insert photo in lid frame; replace backing.
 Send Recipe
 Send Messages
 Send Songs
 Send Poems